new patterns and a ‘mini-adventure’

5 (2)

Hello again!

I’m back after my summer blogging break and I have been working on some new patterns that I’m super excited about.

I also joined the wonderful quilting community on Instagram – if you haven’t tried Instagram yet, I recommend it wholeheartedly!  There are so many lovely and talented quilters on there who freely share their ideas and advice – I find it such an inspiring place to be!  My username is @sewingroomsecrets if you want to follow along , I’d love to connect with you there!

It was on Instagram that I first came across the idea of a ‘mini wall’.  Let me explain – a ‘mini wall’ is a dedicated wall where you showcase all your mini quilts!  You simply display all your minis in a mosaic fashion to make a feature wall. And me, being a sucker for all things small and cute, I was hooked straight away 🙂  (Click here for an awesome example of a mini wall by the very talented Camille Roskelley – couldn’t you just die!)

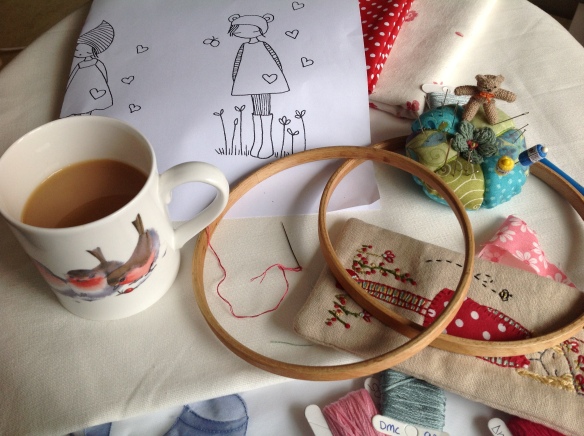
I’ve had the most fun designing a trio of whimsical style minis and am super excited to share two of them with you today (number three is coming soon!).

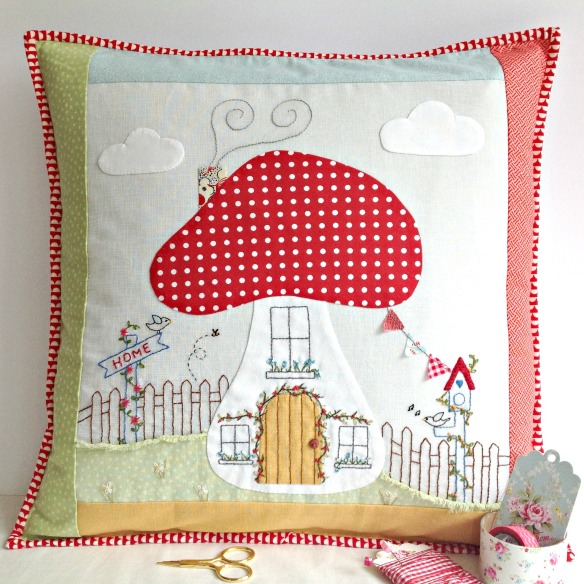
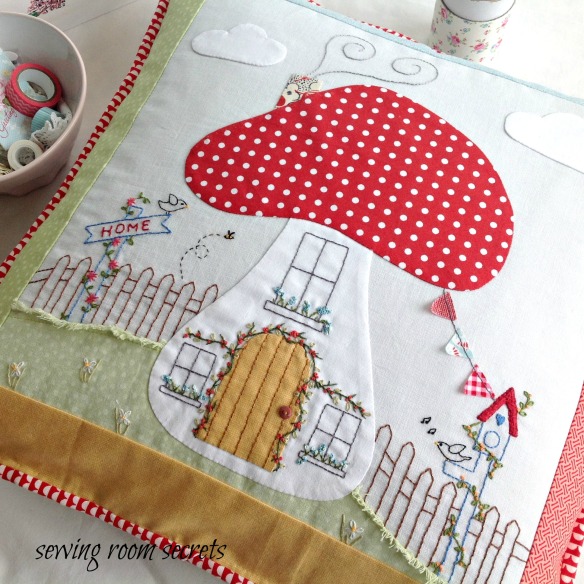
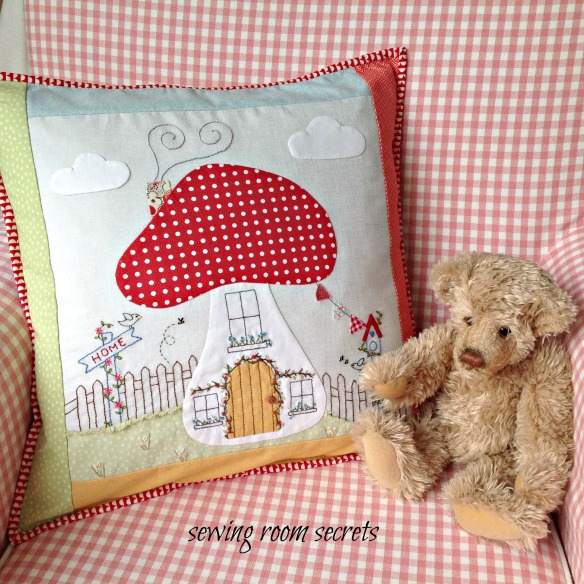
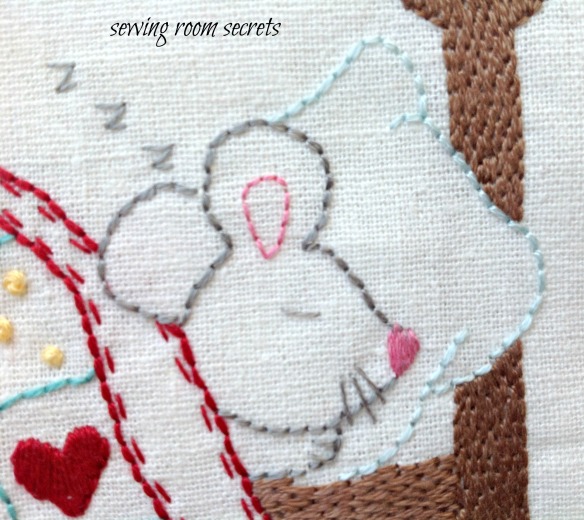
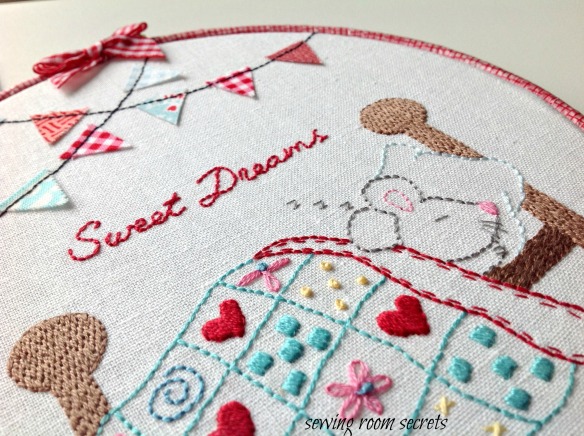
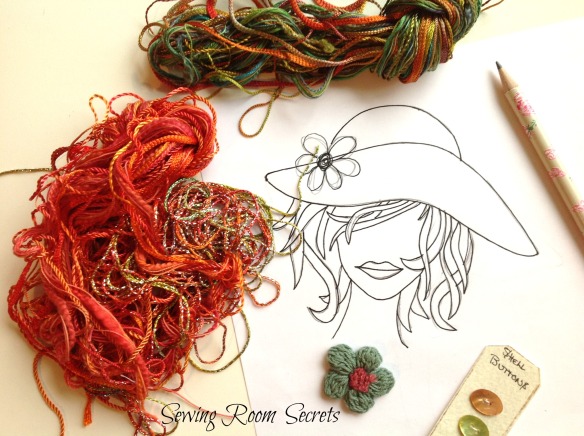
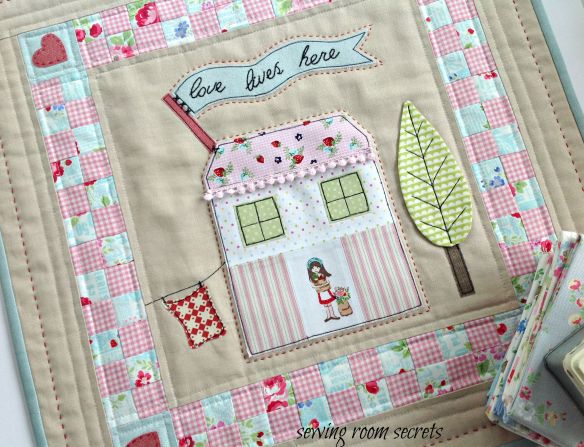
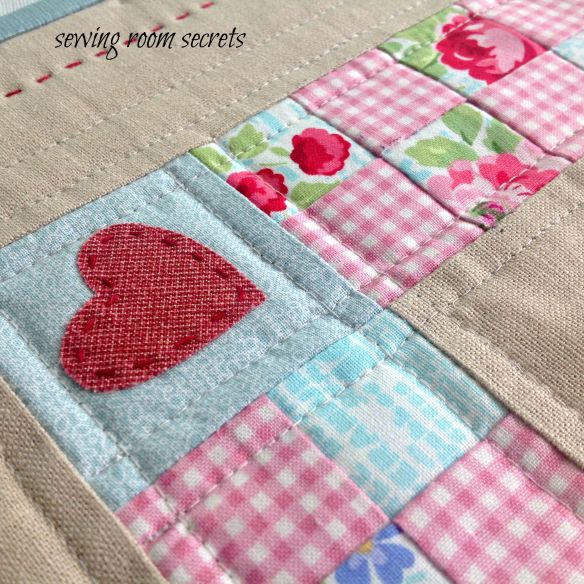
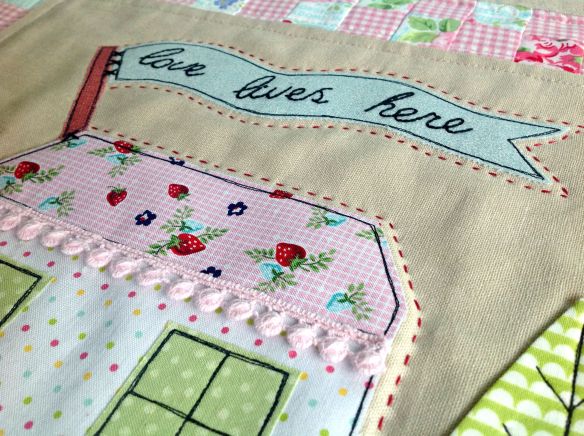
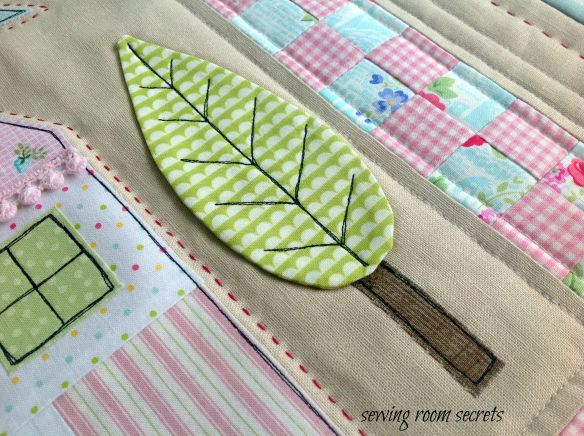
First up is this little mini entitled ‘Love Lives Here’.

7 (2)

This one was inspired by a little block I made for a charity quilt. I had so much fun with this wee project and love how it turned out! And judging by your feedback on Instagram and Facebook you guys love it too!  Thank you so much!

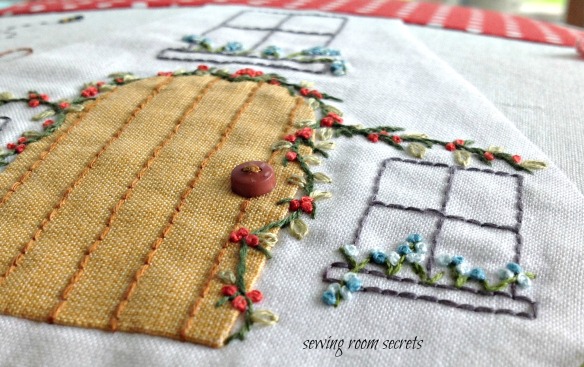
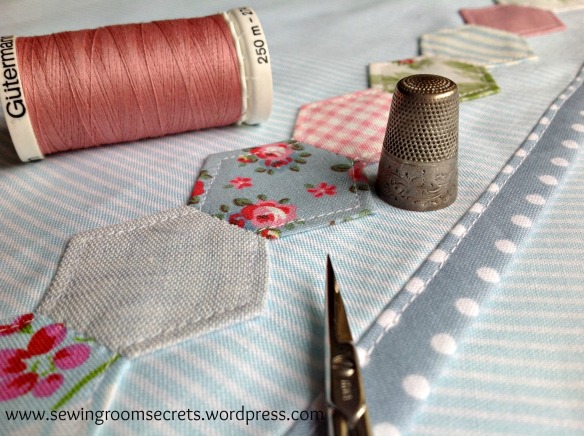
Finishing up at around 20.5″ square, the pattern uses easy raw edged applique techniques and a simple patchwork border to create this sweet little quilt.

Heart.

banner

tree

IMG_8938

tree2

Next up is ‘Woof!’

cover2

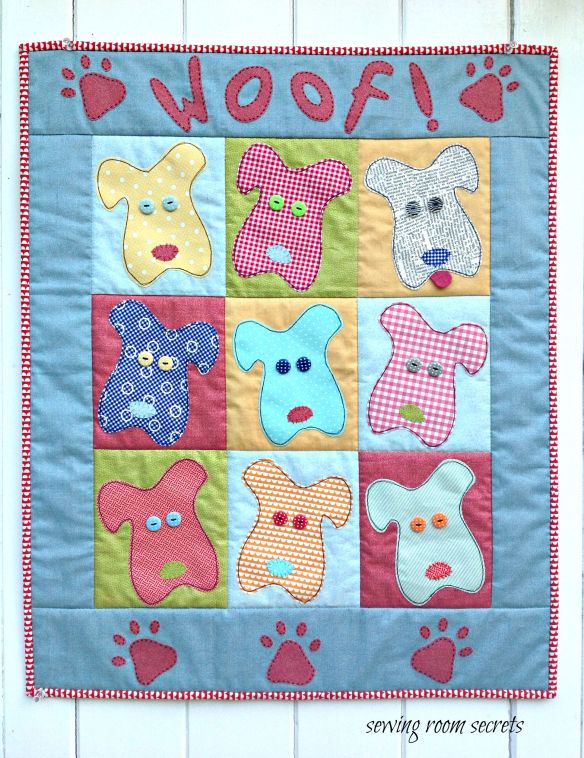
Now as minis go, this one is definitely on the larger side (22″ x 27″), but still cute! See that little pup in the top right ? … he’s the cheeky one! 🙂

tongue..

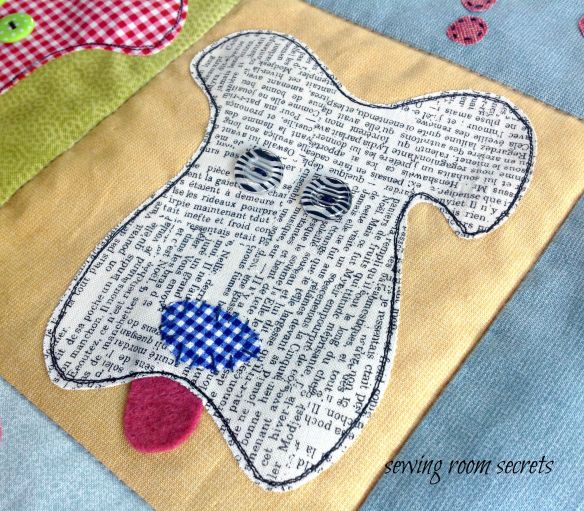
Raw edged applique is used on this one too, along with a few basic embroidery stitches, making ‘Woof’ and ‘Love Lives Here’  suitable projects for even a relative beginner.

nose

And guess what? I’m planning a ‘mini wall’ in my sewing room – won’t that be fun! I think this may be the start of a ‘mini adventure’! I’ll be sharing pictures of all the minis I make in future posts and would love to hear what you think as my mini wall evolves!  I’m hoping to include some ‘pieced’ minis (all patchwork) as well as the whimsical style ones I’ve been working on. I’ll be utilising my own patterns as well as minis from some of my favourite designers, so there should be a good mix.

Well now, how about a mini-giveaway? I’m going to give-away a mini quilt pattern to one lucky reader on each of my Instagram and Facebook pages, as well as here on the blog.  That’s 3 chances to win!

For a blog entry, simply leave me a comment telling me which pattern you would like to win i.e. ‘Woof! or ‘Love Lives Here’.  Then pop over to Facebook and Instagram to enter there too if you like!  The giveaway is only open until tomorrow evening (that’s Monday, 7th September) at 6pm (GMT), so you need to be quick! I’ll pick a winner tomorrow night, but if you don’t want to wait until the giveaway ends you can grab your copy from my ETSY shop now.

Good luck and happy stitching!

Natalie xx

P.S. have you made any minis yet?  Leave me a link in the comments and I’ll pop over for a peak! 🙂

a little bit of whimsy

pillow front sewing room secrets

I didn’t intend to stitch a mushroom house.

But then we were challenged at our sewing group to make a 12 1/2″ block suitable for a child’s quilt, with a theme of ‘homes and gardens’. The quilt blocks will be donated to a charity called The Linus Project, sewn into quilts and given to sick children.  Great, I thought, can’t wait to get started!

It was the red and white polkadot fabric that caught my eye – that’s when the idea of a mushroom house began to take shape.

pillow angle2 sewing room secrets

So I appliqued the little house and a couple of clouds in the sky. But I didn’t stop there.  I love details you see.  I can’t help myself.  I stitched a crooked picket fence, a birdhouse, creeping vines, window boxes, birds, bees, bunting and roses around the door. Finally, some wisps of smoke billowing from the chimney (just to show that someone is home!).

flower detail sewing room secrets

embroidery detail2 sewing room secrets

bird house sewing room secrets

door2 sewing room secrets

When I’d finished, I soon realised that my whimsical little block wouldn’t really be suitable for inclusion in a child’s charity quilt that is likely to be washed repeatedly. Back to the drawing board to think of something else.

But I was determined not to let this cutie become just another UFO (unfinished object) so I made it into a cushion and added some sweet red & white binding around the edges (way easier than making piping!) .

cloud sewing room secrets

cushion on chair sewing room secrets

And speaking of cuties, I forgot to show you what I did with my little embroidered Harriet.  I framed her in a patchwork frame that I picked up at Ikea last year – it couldn’t have been more perfect for her! And the best part?  The frame was only £6! All I did was add a little wadding behind and some ric-rac around the inside edge to make it pop!

Harriet7

Harriet1

Harriet seems content in her new home 🙂

Natalie x


‘sweet dreams’

Cover sewing room secrets.It’s funny where we get our inspiration from sometimes. I can’t say for sure exactly where mine comes from, it just kinda finds me somehow. Sometimes it’s a colour or a memory or just because I have a ‘need’ for a certain thing, so I try to figure it.

The inspiration for my latest little embroidery design came from an old sketch that I stumbled upon, in amongst some old photos recently.

Sketch

It was Christmas 1983 when I etched that little scene in my jotter at school.  I remember I was on ‘Library duty’ in the sixth form centre at the time and should have been using the time wisely to revise French.  But, as you can see, I had other things on my mind!

I should explain that the sixth form library was a partitioned off area in the corner of a much larger room. The partitions were made of floor to ceiling glass panels so you could see in and out of the library into the larger room/study area. There was always a teacher present in the study area to ensure that students were using the time productively to study.

Now I have no idea why I thought that the library was sound proof (call me naive or stupid – you choose) but that day, as I sat in the library on my own sketching my little Christmas scene, I began to sing ‘Jingle Bells’ at the top of my voice.  Oblivious to the fact that the entire sixth form could hear me, I then went on to sing other Christmassy tunes. I had belted out several renditions of ‘Rudolf’ before the teacher on duty got up from her desk and walked towards the library door.   As she stood in the doorway and barked “We can all hear you!!”, the entire room erupted with laughter (including me). Needless to say, I got a detention that day for my shenanigans, but on the up-side I managed to hide the little drawing and I’ve kept it all this time … 🙂

sketch2.

And now, more than 30 years later, I have sketched that little sleeping mouse again – only this time as an embroidery design. He looks like such a peaceful little soul, that wee mouse, gently snoozing under his quilt.

Sleepy head

I added some mini bunting above him, just for fun!

IMG_7739

I simply l-o-v-e-d stitching his little patchwork quilt. Cute, cute, cute!

full quilt.

I am gifting this little piece of hoop-art to my God-daughter to hang on her bedroom wall. I can’t wait to give it to her … hope she likes it.

IMG_7735

I’ve popped the pattern in my Etsy shop – it includes instructions on how to decorate your embroidery hoop and how to finish your hoop-art at the back too!  (I also think this little design would look super cute on a pillow or as a panel on a little tote bag )

IMG_7742..

 Happy stitching and ‘Sweet Dreams’ everyone!

Natalie  xx


tidying up can unearth long forgotten treasure

I came across these tit-bits whilst I was tidying up today

Lola threads.

And it got me thinking.

Those gorgeous orangey shades reminded me of a certain lil’ redhead that I stitched once upon a time. .. can ya guess who? For anyone new to my blog, this is the sassy little lady I am referring to

Lola21

Needless to say, the tidying came to an abrupt end and I grabbed my pencils and paper and this wee sketch emerged …

Lola sketch

I am going to enlarge the drawing big enough for a cushion cover. I think Lola will look very ‘chic’ in a wide-brimmed hat and I’m looking forward to weaving those gorgeous strands into her lovely locks…

… am I sounding confident?  Like I have a plan and know exactly how to proceed? Good, cos I’m trying to convince myself that I do :).  Truth is, I have had these threads for years because I have absolutely no clue how to use them!  I bought them many moons ago for no other reason than I just had to have them. They shone and sparkled and called to me and I knew straight away that I needed them in my drawer life!

I am not at all sure how I will work the threads in –  they are all different thicknesses to begin with, not at all like ordinary embroidery floss.  I guess that’s why they are so appealing…

Lola threads

But I like them.

A lot!

So I am inspired to give it a whirl and see what happens, plan or no plan! 🙂

Happy stitching!

Natalie x

love entwined … slow progress

I’m making very slow progress with my Love Entwined quilt …

The truth is, I found stitching the zig-zag border very tedious (there, I said it!) and that led me to abandon the quilt for a long time. Eventually, I did pick it up again and have been getting on with things a lot better now that the border is finished!

So, the first vase is now brimming over with berries and blooms and I  just need to embroider a few stamens to a couple of the flower centres.

LE flowers4

LE flowers1

lily2

LE flowers5

LE flowers3

LE flowers2

Now I’m working on the second vase of flowers …

Vase2

I apply tiny drops of Roxanne’s glue-baste-it to hold the pieces in place before stitching them down.

Roxanne glue-baste-it

This amazing applique glue dries in minutes, holds great and is 100% water soluble, with no harmful chemicals, dyes or waxes.  It also comes with a super fine syringe-like applicator which allows for controlled droplets of tiny beads of glue just where you need it! I find glueing so much better than pinning, since I don’t prick my fingers so much 🙂 That’s gotta be a good thing, right?  Cos who wants blood on their quilt?

berries

Fern

And, best of all, I get to combine embroidery and applique on this quilt too … *happy sigh*

embroidery2

embroidery1

small purple flower

.. and it was so worth it to persevere with that pesky border, cos the end result is pretty cool! I love the whole 3D effect with the zig-zags 🙂 This is how the whole thing looks from a distance …

photo.

Whether or not I ever go ‘all the way’ with this quilt remains to be seen (the finished size is 90″ x 90″ – yikes!), but right now I’m not looking too far ahead. One piece at a time is enough for me …

Happy stitching!

Natalie x


fabric iPad sleeve tutorial


Harriet 005.

I had been wondering what I could make with a little embroidered piece that I stitched recently and finally decided on a new iPad cover.  I already have a ‘Smart Case’ for my iPad and, whilst I like the protection that the hard folding cover gives to the screen, the fact remains that it is a dull grey colour, a little grubby from fingerprints and well … just plain boring!

So, I wanted to pretty things up a wee bit and this is the result …

iPad cover1

iPad cover3

iPad cover2

iPad cover9

iPad cover7

iPad cover11

I made a slightly different version for my mother-in-law, adding her initial in embroidery on the front. I added a velcro flap at the top, rather than an elastic and button closure and I also quilted the background of the linen section.  I found some wonderful embroidery templates for monogram letters here.

iPad cover4

If you would like to have a go at making a fabric iPad sleeve, I’ve jotted down some quick instructions below on how I made mine.  You can do anything you like on the front cover – I used my new Harriet & her Teddy design on the front of mine (available in my pattern shop), or you can just keep it simple by using two pretty co-ordinating fabrics – just go with what you fancy!

Before we get started, I need to point out that I made mine big enough to accommodate an iPad4 and a Smart Case.  If you want to make a cover just for an iPad on it’s own, I would suggest using a 1/2″ seam allowance throughout (for a snugger fit), rather than a 1/4″ seam allowance.

So, what you will need is:

For the outside

  • 2 pieces of fabric 9.5” x 8.75” – for the bottom of the outside cover
  • 2 pieces of co-ordinating fabric 9.5” x 3” – for the top of the outside cover
  • 2 lengths of ribbon around 10” long, plus extra for the bow
  • 1 small button (for the bow centre) and a larger button for the closure
  • 1 adult hair elastic/ponytail holder (or similar thin elastic)

For the inside

  • 2 pieces of thin wadding (batting) 9.5” x 11.25”
  • 2 pieces of lining fabric 9.5” x 11.5” (the extra 1/4″ in length for the lining fabric is for the trim at the top edge)

*Use 1/4″ seam throughout

1. Cut out all the pieces before you start

Harriet 3

To make the outside cover …

2. With right sides together, stitch each of the two top pieces (9.5” x 3”) to the bottom pieces (9.5” x 8.75”)

Harriet 1

3. Cover the seam lines by stitching on some co-ordinating ribbon

Harriet 2

4. Make a ‘quilt sandwich’ by laying one 9.5” x 11.25” piece of wadding down on your work table first, followed by the front cover (right side up), followed by the back cover (right side down), and finishing with another 9.5” x 11.25” piece of wadding. Line up all raw edges and pin.

5. Stitch all four layers together using ¼” seam, leaving the top open. Backstitch a few stitches at the start and end of sewing to stop the seam opening when you turn it right side out.

Stitch all the layers together

6. Trim away the wadding to about 1/8th of an inch from the sewn line to reduce bulk, clip the corners and turn right side out. Push out the corners to give nice neat points.

7. Sew the elastic hairband onto the outside of the back cover by placing it in the centre and stitching over it a few times about an 1/8th of an inch from the edge. Allow a little of the elastic to hang off the edge (you will trim it later).

Harriet 11

8. Now take your lining fabric and place the pieces right sides together. Stitch down both long sides and along the bottom, leaving a 4” opening at the bottom for turning. Leave the top open.  Clip the corners, but don’t turn it right side out yet!

Lining

9. To join your outer cover and lining, keep your lining inside out & your outer piece right side out and slip the assembled cover inside the lining, matching up your two side seams. They should now be right sides together.

Harriet 10

10. Line up the top edges of the lining and the outside cover and stitch a ¼” seam all around the top edge. Trim away the excess elastic from the seam allowance.

Collage1

11. Gently pull the front cover through the gap that you left in the lining. *Tip:  I use a star headed screw driver to turn things out as I find that the little star head grips the fabric and helps things along 🙂

Harriet 512. Poke out the corners and press

Harriet 8

13. Stitch the opening closed

sew opening closed

14. Gently push the lining inside the cover.  You will find that a little of the lining will naturally fold around the wadding at the top edge to give a nice little trim along the top (that’s the reason why we cut the lining pieces that extra 1/4″ longer 😉 )

iPad cover12

15. Sew on a pretty button and top-stitch ‘in the ditch’ where the lining and the outside meet to give a neat finish (although it looks just fine without this step).

Top stitch to finish (optional)

ipadcover5

I have just begun to stitch another little version of Harriet & her Teddy, this time I am embroidering the entire thing on to soft white linen (no applique).  I’ve added tiny beads as flower centres and smocking at the top of her dress…

A pocketful of posies


… not sure what it will become this time, just gonna see where the stitches take me …

Natalie x


one year ago today …

… I began my adventures in blogland with a very nervous first post from my sewing room.

To tell you the truth, I was not at all convinced that anyone would be the slightest bit interested in my ‘wee bits o’ nonsense’ (aka sewing projects).  But I was amazed how quickly I was made to feel welcome in the blogging community with lovely comments and words of encouragement.  Bloglanders are such a friendly bunch 🙂

Looking back over my blog I realize that I have created a colourful little journal of my life in stitches!  I didn’t think about that aspect of blogging when I started out, so it’s an unexpected and happy bonus!

Hexy flower side view

One year on and I would like to thank you all for reading my words, looking at my pictures, checking out my tutorials and for all your wonderful encouragement and amazingly generous comments! I can’t tell you how much you brighten my day by taking time out of your busy lives to share your thoughts with me!  It is particularly heart warming when someone tells me that they have been inspired by something they have seen on my blog! And I have to pinch myself when I see a Sewing Room Secrets project on Pinterest!  That still freaks me out every time! (in a good way!!)

I have picked out 12 of my favourite makes and posts from the past 12 months and hope you will humour me as I take a little trip down memory lane…

Little hexie needle caddy

Little hexie needle caddyIt’s a giveaway!

Etsy Collage

A treasury of applique

sewing-room-secrets-sewing-caddy11

Hexagons for Harriet

Harriet before applique

‘Lola’

Lola8

Zakka Style

fabric boxes11

Zakka inspired gift set

red-set-with-flower1

‘Morning Star’ … a journey of a thousand stitches

Morning star 20

How to make a Suffolk Puff

image

Time to just be me

My glasses case

Catching up …

Crafty Creatures

On white

Chocolate Tiffin Recipe

tiffin5

Thank you for your company this past year … having you along for the journey has really been a blessing 

●●●●●●●●●●●●●●●●●●

*Edited: I will be taking a step back from blogging for a while, as I will not be able to devote as much time to it in the coming months, due to other demands in my life right now. I will still be ‘around’, working on my Love Entwined quilt and drafting several new patterns for my Etsy shop, but unfortunately blogging will have to take a back seat for now.  I will try to pop back from time to time with updates when I can, but for now I bid you all a fond farewell and happy stitching!  Love & hugs, Natalie xx


happiness is …

…a pot of tea, an open fire and some quiet stitching on a Sunday afternoon

LE centre4

I’m working on a new appliqué quilt called ‘Love Entwined’.  It is an historic appliqué quilt dating back to 1790, which has been interpreted and re-created by Esther Aliu (you can read more about it here). Esther is generously offering this magnificent quilt as a free BOM over on her blog, if you care to join in 🙂   Just hit the button in the sidebar and it will take you straight to Esther’s blog.

Original LE Black & White

Not much is known about the original, other than it is from the Georgian Era, England, heavily appliquéd and is described as a ‘fine marriage coverlet’.  It will be a real labour of love and will probably take me in the region of two years to complete!!

LE centre2

LE centre3

It took me ages to get started … partly because I discovered it just before Christmas when I had a million and one other things to do, but mostly because I was nervous about the huge undertaking that this quilt represents.

I mean this is BIG! Not just in size (96″ x 96″), but also in the challenges that it poses.  It is an intense appliqué project and I have never attempted anything quite on this scale before. Yikes!

The first challenge was choosing the fabrics.  This is the part that, for me, takes forever as I keep changing my mind!  Laying out some fabrics on my work table helped a lot 🙂

LE fabrics3

The second challenge was the Mariner’s compass block as I have never done one before. It took a couple of attempts, but I got there in the end …

LE embroidered dots

The appliqué pieces on this quilt are an awful lot smaller than they look, but I have been getting around it with a few carefully placed embroidery stitches 😉   

Now that I have finished the centre circle, I think I am over the worst.  Yeah right, who am I kidding?

flower

applique flower2

… one solitary little embroidered flower added, only nine more to go!

What new challenges have you set yourself for the New Year?

Happy stitching!

Natalie x

little hexie needle caddy

If you have been following my blog for the last however many weeks you will know that I have been afflicted with a bad case of ‘hexagon-itis’ and my wee pink tin of 1/2” hexies has been my constant companion.  I have really enjoyed re-acquainting myself with the simple pleasures of making hexagons (something I haven’t done since I was a child!) and I can at last reveal the final resting place for all those little six-sided cuties!

Needlebook on fabric pile

My wee pink sewing tin is empty – almost! Just a few lonely little hexies left languishing at the bottom for another day …

pink tin empty2

It has been a very interesting and rewarding mini-hexie-adventure, which began with a neat little pile of the prettiest fabrics …

fabric pile 2

which turned into these …

Hexie tower2

Hexies before joining

which were sewn together like this …

Hexies

which grew into this …

Hexy6

and was appliqued on to linen and embellished with pretty beads and the simplest of embroidery stitches …

Hexies long row with embroidery

and framed all neat and tidy with some dotty aqua binding …

Needlebook binding

to create the perfect home for all my sewing needles 🙂

cover

fully open with needles

Needlebook Open with needles

slope down to the right with needles

When I started making all those wee hexagons I had no idea what I was going to do with them all.  I just liked the cuteness of them and the fact that they require no special tools to construct, just paper, fabric, needle and thread.  No special effort or concentration … a way to just sit, be still and stitch for the love of it.

Needlebook9

Needlebook51

Needlebook47

cover angle flowers

Needlebook10JPG

Needlebook37

It’s been interesting sharing my love affair with hexagons here on my blog and on my facebook page, as it has revealed to me that people are ‘hexagonating’ all over the world! And loving it! It seems we all have a certain fondness for the humble hexagon.

I have written up a pattern for my little needle caddy and it will be listed in my Etsy shop from midnight on Thursday 15th August 2013. I have loved working on this sweet little design and it has been made even more fun by having all of you hexie lovers along for the ride, keeping me company in all my little sewing endeavours, during what has been one of the most glorious British summers for many a long year! Thank you, and happy ‘hexagonating!’!

close up thimble

I am taking a little summer break from blogging and facebooking, but I will be back in September again :). Whilst I may be absent from cyberspace for a few weeks, I will still be ‘around’ stitching and  creating .

Until September then … happy stitching!

Natalie x

hexagons for harriet

….. my ‘hexagon-itis’ continues to worsen and I fear I may be well on my way to a diagnosis of hexie-mania!

I really have got it bad! I sneak them everywhere with me – my wee pink sewing tin fits discreetly in my handbag and I find myself whipping it out for a quick fix any opportunity I get …(please don’t judge me)

Hexies in a tin

tin & hexies2

I’ve even been ‘hexagon-ating’ in public … yep, in the dentist’s waiting room, at my desk in work, on a park bench, in the garden  …

Garden table

hexies close up3

Hexies on the grass

On the plus side, I find that each time I make a few of these six-sided cuties, it seems to ease the symptoms … if only a little 🙂

Hexy flower with scissors

The recent heatwave in the UK has made it difficult to do any serious sewing as it has just been too darn hot! However, the last couple of days have seen a drop in temperature, which has been a welcome relief and I have been able to work on the cushion I was making for my sewing chair, using my ‘Harriet & her Teddy’ embroidery design (available in my Etsy shop).

Harriet before applique

Harriet side view

If you are not familiar with the English Paper Piecing method for making hexagons, there are oodles of great tutorials out there, so I won’t re-invent the wheel by doing another one here. For small hexagon paper piecing, I can recommend this tutorial from V and Co – it has lots of great close up photographs and easy to follow tips and advice. And for those of you who want to go to the next level and learn some imaginative and creative ways to use hexagons in your quilts, I would highly recommend a visit to Faeries & Fibres for lots of tips, tutorials and hexie inspiration.

Hexy flower side view

Hexy flower very close

Hexies close up

When joining one hexagon to another here are a couple of tips that work well for me:

  • I like to use a fine needle (size 10) so that I can easily catch the fabric as close to the edge as possible. This helps to make sure that your stitches don’t show up as much on the right side of your work.
  • I prefer to use ladder stitch rather than the more usual whip stitch for the same reason, that it helps to hide your stitches.

I also like to use a paperclip to hold the paper in place whilst tacking down the sides, but some people use freezer paper or even a glue stick to stabilize the paper template. 

hexie paper clip

I always think that a cushion looks so much more polished and professional when edged with some piping, don’t you? But I get put off at the thought of having to make all that bias binding and usually just end up doing the standard plain edge finish. But not this time…. 

cushion side on

Sewing is a continually evolving journey.  No matter how long you have been stitching, there is always a new technique to learn or a fresh way to look at something you thought you already knew.  I had come across tutorials in the past on how to make continuous bias binding, but had never tried it out for myself.  This technique is basically a way to eliminate the tedious task of having to join all those bias strips, end to end, to get the length you need. I used this tutorial by Sew Mama Sew to show me how and, oh my goodness! Why have I never done this before?  It’s pure magic! I don’t think I will ever make bias binding any other way!

Piping cord covered in continuous bias binding

Piping cord covered in continuous bias binding

I machine appliqued a row of hexies to decorate the back

Hexy border

back border

Cushion back

And so, my little Harriet now adorns this cute little cushion on my sewing chair …

Cushion on sewing chairUp until now, Lola has been ‘my girl’, but I know that there is room enough in my heart for little Harriet too 

Happy stitching everyone!

Natalie x

every path has it’s puddles ….

Harriet & her Teddy

I am writing this post long-hand.  I decided that today was just too sun-shiney to be indoors on the laptop, so here I am with pen and paper writing down my thoughts the old fashioned way.  Of course, by the time you read this I will have typed it all up neatly on my trusty keyboard; but that will happen much later, when the sun has gone to bed.

As I write, this is the view of my little piece of sky, lying here looking up to the heavens from   a sun lounger in the garden.  Ahh, dappled sunshine … my favourite kind! 

dappled sunshine

Lying here in the sun, you could say that life is pretty good right now … and so it is.  That’s the funny thing about life, some days are just better than others 

In my last post, I promised to tell you the story behind the stitches of the little embroidery pattern that I have been working on, featuring Harriet and her Teddy.   I wasn’t crazy about my original choice of background fabric or colours, so I experimented a little until I came up with something that I am now happy with. It has taken a little longer, but I think it has been worth it in the end and the pattern is now available for sale as a PDF download from my Etsy Shop.

Harriet's face & hat detail

Whilst stitching this watery little scene, it has made me think about how life ebbs and flows.  How sometimes, things are just peachy (like today) and at other times you wonder how you will get through the tough times.  I don’t know how it is for any of you, but as I’ve grown older, I have realized that life is often all about perspective and going with the flow.

when it rains

At the moment, Harriet is lying on my work table waiting to be stitched into a cushion for my sewing chair.  The idea being that next time something goes awry in my life … when I’m feeling stressed by a million things that all need to be done RIGHT NOW or I feel like I’ve encountered an insurmountable problem, it will remind me that I can just stand in the rain for a time and not let it pummel me. I don’t have to panic or shield myself. I just need to ride it out, to take what comes, knowing that I’ll handle it and it will all pass by soon enough.

I can follow Harriet’s example …. let go of the umbrella and just get a little wet!

When it rains2 Happy stitching  

wedding fever, a swap and a new pattern

The Very Berry Handmade Textile ATC swap has come to an end and, a little over a week ago, I posted my wee card off to my swap partner with a little note. 

ATC envelope

The recipient is an American lady, so my little offering has flown all the way across the pond to New York! I do hope she likes it.

In the meantime, I have received this delicate blossom tree from Kathie who blogs over at Dipity-do-dah.  Those sweet little blossoms are really, really tiny and are not embroidered on, but cut from fabric!! Wow! Thank you Kathie – I love it!

ATC received May 2013

You can see a lot more amazing designs over on the flickr group – such a diverse mix of ideas and interpretations!  It was a lot of fun and I am looking forward to the next Very Berry Handmade ATC swap later on in the year.

Alas, no sewing for me today I’m afraid.  Instead, I’m off out shopping for a wedding outfit – the wedding is next Saturday, so I’m cutting it fine, yikes!    (Note to self: don’t kid yourself that you will find wedding attire in John Lewis haberdashery department … resist going in there. … resist … 😉 ).

We will be having some house guests stay with us from my husband’s side of the family, so I can feel a bit of spring cleaning coming on and some cake baking too! It won’t all be cushion plumping and kettle polishing though – I will be making sure that I set aside a little sewing time before the wedding to do some hand quilting on my Mile-a-Minute scrappy quilt (which hasn’t been ‘mile-a-minute’ at all, by the way – but that’s a whole other story for another day :))

MAM quilt5

MAM quilt4

MAM quilt3

And finally, I am super excited (and a wee bit nervous?) to tell you that I will soon be launching a pattern shop from my facebook page.  It isn’t up and running yet and I am working hard behind the scenes to get my first pattern on there for sale as a PDF download.  I have lots of ideas for stitcheries, wall hangings, dolls and more!  Here is a sneaky peek at the first pattern that I hope will be available soon ….

When it rains detail

This will be one of a series of fun stitcheries featuring Harriet, a little girl who never ventures far without her Teddy.  Each stitchery will depict a day in Harriet’s life, or reveal a little bit about her character. I’ll reveal the message behind this little scene, once I’ve finished stitching it 🙂

Now, it’s time I hit the shops – that wedding outfit ain’t gonna buy itself!  Happy stitching folks!

good fortune for ‘Lola’

I say ‘good fortune’ because, if it had not been for the fact that I have a soft spot for ‘Lola’, she would not be sitting pretty right now, rather she would be sitting in the dustbin!

Lola23

As soon as I saw the latest edition of Molly Makes, I just knew that Lisa Lam’s little fortune cookie purse on the cover would be perfect for Lola, so  I ordered the frame straightaway from U-Handbag and got to work making up the body of the purse.

Lola16

I have never made a framed purse before, but  the pattern was straight forward enough and I was surprised at how quickly and easily it all came together. 

So, this little purse-y version of Lola sat proudly on my work table with a pin holding it closed, patiently awaiting the finishing touch – that lovely antique brass frame! As I gazed lovingly at the little bulbous pouch, I was beginning to think that I could even run up a few more and give them as gifts. But I was getting ahead of myself …

A few days later the purse frame arrived.  Now, I knew I would have to glue the frame to the fabric and, if I’m honest, a few wee pangs of anxiety were already beginning to creep in – it was the ‘glue’ that was making me nervous. Give me a needle and thread any day, but glue? Mmm … nah!

Lola24

I mean, get a grip, how hard could it be to glue the frame on?

To say I swore a couple of times would be a lie… more like a dozen times or more!  The air was blue, I can tell you – even my husband put a concerned head around the door at one point to see what all the huffin’ and puffin’ was about. The problem was that the purse was just the teeniest, tiniest bit too small for the frame and, try as I might (and I tried mighty hard!), there was no way that I could get that little bugger to fit in the frame! Poop!

To cut a long story short, I ended up having to insert a tiny little triangle of fabric each side of the gusset to make it fit.  And even then it took a good bit of jiggery pokery to get the pesky thing just right. Talk about a bad frame day! Tsk!

Anyhow, as the saying goes ‘all’s well that ends well’ and perhaps I will love that wee Lola purse even more for all the trouble it caused me 🙂

Lola20

I thought at first that I would use the purse for make-up …

Lola14

Lola22

But then I changed my mind.

I think ‘Lola’ deserves pretty ribbon and lace …..don’t you?

Lola15

Because she’s worth it 😉

Happy stitching folks!

ATC swap – please help me choose?

Do you remember me showing you the trading card that I made for the Very Berry Artist Trading Card swap?

Well, I have managed to make another wee piece of stitchery to show you and have done so just in the nick of time, as the deadline for posting the cards to our swap partners is in a few days!

ATC2.2 May 2013

This is the part where I ask for your help, my bloggy friends…….

Please could you help me choose which one to swap? I am going to be asking my Face Book buddies too.  Hopefully, it won’t go to a tie breaker, lol ;). Here is the first one I made ….

ATC final

Please leave me a comment below , telling me which one you would prefer to receive if you were my swap partner.  I need to post the card by May 31st at the latest!

Thanks so much! I really appreciate your help on this one 🙂

Happy stitching!

I’d like you to meet ‘Lola’

Do you ever have times when you get ‘half’ an idea, but it feels all scattered in your head and you just have to keep playing with it until it eventually becomes something solid?

‘Lola’ has been on my mind for a wee while now.

Lola1

After sketching her outline and transferring it to linen using a washable marker, I appliqued her headband using some of the red & white polka dot fabric I had left over from making the little LiliPopo glasses case. Normally, I like to applique by hand, but I thought this particular design would look better with some machine stitching.

Lola2

I started by outlining the basic shape of her hair using two strands of embroidery floss and a simple back stitch.  I then did some colouring-in with crayon! No kidding! Crayon! I thought it would be a good idea to have the colour show through any gaps in the stitching.

Lola4I wanted to keep her fringe heavy and have it sweep across her forehead to cover one eye. I have layered in some texture to her hair by varying the thickness and colour of the threads I used. The whole thing has been sewn using only three simple embroidery stitches – straight stitch, split stitch and couching.

That’s what I love about embroidery – the simplest of stitches are all you need to paint a picture on a blank canvas.

Lola8

I used a single strand of golden yellow for the ‘highlights’ and simply couched it in places to create waves (check out my hairdressing action 🙂 ) I also used some nobbly dolls hair that I bought ages ago, and it’s been perfect for creating a tight curl effect.  Again, I’ve simply couched it in place.

I’ve loved watching Lola’s personality come to life – to me she looks kinda cool and edgy – and I really feel that I’ve got to know her during our time together. And the name …. Lola? Well, I think it suits her don’t you?

And I couldn’t leave her nameless could I? Cos then she wouldn’t be real …… 

Lola11

I think I’m a wee bit in love with ‘Lola’ …. ♥ 

But what to do with her now?  …..I’m already working on it  🙂

Happy stitching everyone!

a parcel and a swap

I posted my ‘wee sheeps’ pouch to Lindsay today. Exciting to think that those ‘wee sheeps’ will be travelling all the way across the pond to Pennsylvania! My! this blogging stuff really can take you places!

Wee sheeps parcel

Next up…. is the Very Berry Handmade Textile Artist Trading Card Swap (phew! try saying that after a few glasses of vino!). I have until the end of May, or there abouts, to design a 2.5” x 3.5” textile card to swap with someone else in the group, so I’ve been looking through my stash for inspiration.

Fabric inspiration

The theme for the swap is “Something New”, which pretty much gives me infinite scope, since the whole process of blogging and swapping is all pretty “new” to me! I wanted to make something that will bring a smile to the person receiving it in the mail and I hope this little offering will do the trick 🙂

ATC borders

ATC final

It’s been fun making this little example of teeny tiny loveliness and, if I get time to try out a few more designs before the swap deadline, I’d love it if all of you would help me choose which one to swap! 🙂

Happy Stitching Everyone!

<a href=”http://www.bloglovin.com/blog/6470335/?claim=6ytay4y2gvf”>Follow my blog with Bloglovin</a>

a treasury of applique

Sewing Room Secrets Sewing Caddy1

Given the choice, I prefer hand sewing over machine and appliqué has got to be one of my favourite techniques.  It’s like a form of art, I guess – the way you can take the teeniest, tiniest scraps and layer them, so as to build a picture out of nothing.  The down side to this, of course, is that I find it difficult to throw even the smallest piece of fabric away.

I recently made a little appliqued sewing caddy and it has been getting such a lot of attention from fellow stitchers that I thought I would share it here on my blog.

Sewing Room Secrets Sewing Caddy13

I first saw the pattern by Hitomi Fujita in one of my quilting magazines, yonks ago, and I fell in love with it straight away (Australian Patchwork & Quilting, Vol.4, No.6).

Australian Patchwork & Quilting MagBut, you know how it goes – it went down on my ‘to do’ list and then was forgotten about, until a few months ago, when I was flicking through my collection of old magazines (I can’t throw them away either :)) and I came across the pattern again. 

Sewing Room Secrets Sewing Caddy14

I’m so glad I didn’t just file the pattern away again, because now I have the most wonderful little home for all my sewing essentials.

Sewing Room Secrets Sewing Caddy11

There is a place for everything, from my embroidery scissors

Sewing Room Secrets Sewing Caddy9

a small fastener ensures that my scissors stay securely in place

to my tape measure and leather thimble

Sewing Room Secrets Sewing Caddy8

pockets where I keep my pins, embroidery threads and the all important stitch ripper!

Sewing Room Secrets Sewing Caddy10places for a ruler, pencils and threads

Sewing Room Secrets Sewing Caddy15

there is even a pin cushion and needle book

Sewing Room Secrets Sewing Caddy3

Sewing Room Secrets Sewing Caddy7The great thing is that the needle book and the pin cushion are both detachable from the pouch, as they are secured in place with velcro. Genius!

Sewing Room Secrets Sewing Caddy6

but, best of all, I got to do lots of lovely applique on the outside

Sewing Room Secrets Sewing Caddy5

Sewing Room Secrets Sewing Caddy2

This labour of love is now one of my most cherished creations ….. every stitch holding a memory of thousands of tiny seconds of time spent in my sewing room doing what I love most ♥

Happy stitching everyone!

** Edited 21.12.13**  I have had many requests for the pattern for this sewing caddy. Unfortunately, I don’t know where you might obtain the pattern these days – some of my readers have tried contacting the magazine, but unfortunately they have not been very helpful 😦  I do know that some people have managed to get a copy via Ebay and others via Bonanza.com or by posting a request on quilting forums.

Under copyright law, I am at liberty to publish my own photographs of my interpretation of the design, so long as I give credit to the source and the designer (which I have done in this post) but, unfortunately, the copyright for the design lies with the designer (which is not me!) and so I am not able to re-distribute the pattern in any shape or form, sorry. Natalie x

spring arrives with a baa-ng!

sheep7

I’m back in my sewing room after a lovely Easter break with my family in Northern Ireland.   Long walks, (way too many) coffee shops and ‘wee buns’, warm fires at night and a glass or two of my favourite tipple!

Irish Mist

It’s funny, but I still refer to Northern Ireland as ‘home’, even though I have lived in England now for more than half of my life. There is definitely something magical about going ‘home’ – that feeling of true belonging that cannot be felt anywhere else on earth.

It was lambing season whilst I was there, but sadly there were fewer lambs than usual in the fields surrounding my parents house this year. The recent heavy snow falls meant that many sheep and their lambs perished, buried in huge snow drifts of up to fifteen feet high in some areas! 

Thankfully, many pregnant ewes survived the harsh conditions and, now that the snow has all but melted, lambs are once again a happy sight on the Irish hillsides 🙂

sheep in snow1

sheep in snow2

It was scenes like the ones above that inspired me to create a sheep-themed pouch like the button pouch featured in my ‘button love’ post.

sheep4

sheep3


pouch back


sheep9

I use this one to keep cotton wool in, but there are any number of uses for it. You can find the tutorial for it here.

sheep10

I’m back home in England now and as I sit at my sewing table, looking out at the daffodils making a later than usual appearance, it makes me smile to see their sweet golden faces heralding the arrival of spring at last!

daffodils

Happy stitching everyone!

time to just be me

One of my favourite designers, the talented Kate Popovski (aka LiliPopo), has just released a new embroidery pattern and my copy arrived last week.  I have been itching to get going with it, but there was always something else to do and I’ve not managed to find the time.

Today, with the March sun streaming through an open window, I managed to sit down in my sewing room, just me, and stitch for a few glorious hours. 

lilipopo in progress

Oh! there are few things more satisfying than those precious moments when nothing else requires your attention, other than the needle and thread in your hand and making sure there is tea in the pot!

lilipopo in progress2

I love combining appliqué with embroidery and have done so to great effect in many of my own projects, but I think that these little LiliPopo designs are perfect to showcase just how effective this technique can be.

My glasses case

ipad2

I shall need to carve myself out some sewing time next week in order to make a Mother’s Day gift.  I have some Suffolk Puffs lying around somewhere; I’m sure I can rustle up something lovely with those 😉

First though, I shall need to post this wee glasses case to my aunt in Northern Ireland.

Aunt Hilary's glasses case3

I just love days like today, when you can while away the hours just sewing, nothing else, just that.  Bliss x