
….. my ‘hexagon-itis’ continues to worsen and I fear I may be well on my way to a diagnosis of hexie-mania!
I really have got it bad! I sneak them everywhere with me – my wee pink sewing tin fits discreetly in my handbag and I find myself whipping it out for a quick fix any opportunity I get …(please don’t judge me)


I’ve even been ‘hexagon-ating’ in public … yep, in the dentist’s waiting room, at my desk in work, on a park bench, in the garden …


On the plus side, I find that each time I make a few of these six-sided cuties, it seems to ease the symptoms … if only a little 🙂

The recent heatwave in the UK has made it difficult to do any serious sewing as it has just been too darn hot! However, the last couple of days have seen a drop in temperature, which has been a welcome relief and I have been able to work on the cushion I was making for my sewing chair, using my ‘Harriet & her Teddy’ embroidery design (available in my Etsy shop).


If you are not familiar with the English Paper Piecing method for making hexagons, there are oodles of great tutorials out there, so I won’t re-invent the wheel by doing another one here. For small hexagon paper piecing, I can recommend this tutorial from V and Co – it has lots of great close up photographs and easy to follow tips and advice. And for those of you who want to go to the next level and learn some imaginative and creative ways to use hexagons in your quilts, I would highly recommend a visit to Faeries & Fibres for lots of tips, tutorials and hexie inspiration.

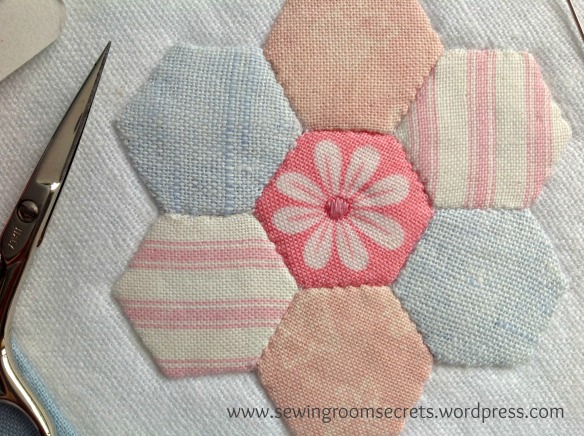

When joining one hexagon to another here are a couple of tips that work well for me:
- I like to use a fine needle (size 10) so that I can easily catch the fabric as close to the edge as possible. This helps to make sure that your stitches don’t show up as much on the right side of your work.
- I prefer to use ladder stitch rather than the more usual whip stitch for the same reason, that it helps to hide your stitches.
I also like to use a paperclip to hold the paper in place whilst tacking down the sides, but some people use freezer paper or even a glue stick to stabilize the paper template.

I always think that a cushion looks so much more polished and professional when edged with some piping, don’t you? But I get put off at the thought of having to make all that bias binding and usually just end up doing the standard plain edge finish. But not this time…. ♥

Sewing is a continually evolving journey. No matter how long you have been stitching, there is always a new technique to learn or a fresh way to look at something you thought you already knew. I had come across tutorials in the past on how to make continuous bias binding, but had never tried it out for myself. This technique is basically a way to eliminate the tedious task of having to join all those bias strips, end to end, to get the length you need. I used this tutorial by Sew Mama Sew to show me how and, oh my goodness! Why have I never done this before? It’s pure magic! I don’t think I will ever make bias binding any other way!

Piping cord covered in continuous bias binding
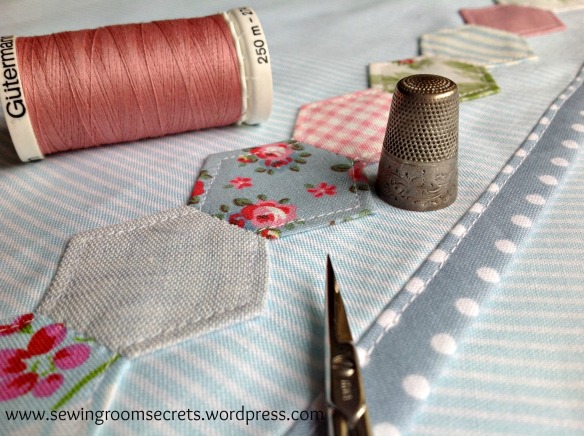
I machine appliqued a row of hexies to decorate the back


And so, my little Harriet now adorns this cute little cushion on my sewing chair …
 Up until now, Lola has been ‘my girl’, but I know that there is room enough in my heart for little Harriet too ♥
Happy stitching everyone!
Natalie x

Brilliant work Natalie
I’m so in awe of your hexagons! Beautiful work – you must be soooo patient 😉
Catherine x
This is absolutely stunning, gorgeous, pretty, huggable… I love it.
Thanks so much Jules! xx
beautiful!!!! wonderful!!!!
hugs
Maria Filomena
Thank you Maria x
Hi Natalie…Your hexagons are so pretty and I love your finished cushion design! I do think piping makes such a difference too and it looks beautiful added to your cushion in the polka dot fabric.
Happy Sunday!
Susan x
Thank you so much Susan. I love polka dots, they’re fun! And I like the subtle contrast of the dots against the pale blue candy stripe x
I’ve recently come down with hexagon-ites as well. I love your little hexagon tin! I need to find something small like that for my purse. Right now I have a bin that’s way too big. Your cushion is gorgeous!
Hi Jessi, thanks for stopping by my blog! I think there is a hexie epidemic at the moment – there are lots of us smitten with the bug 🙂 Thank you so much for your generous compliment about my cushion and have fun with your hexie creations. Natalie x
Two questions Natalie!! Well maybe three!! Can I come sew with you?? I can imagine siting in a British park sewing hexies and drinking tea!
Two, when you said you appliquéd with machine you just sewed hexies carefully on with normal stitch?
Three, what size are these hexies?
I am going to embroider a pic of girl feeding chicks and incorporate hexies like you did! I don’t know about that binding…it looks hard!
You have been my inspiration this week!! Friends! Miss Paula in Stitches
Oh you do make me laugh Miss P! Of course you can come sew with me! 🙂
The hexies on the front are quite small – each side measures 1/2″, but the ones on the back are 7/8″. I hand appliqued the ones on the front and used a normal stitch to machine applique the ones on the back.
The piping does take a little more effort, but I wouldn’t say it was too difficult really and definitely worth it. I am primarily a hand sewer, so if I can do it on a machine, then anyone can!
I am chuffed to have been your inspiration this week Miss P! Friends! Natalie x
Oh this is lovely, love the colours and the delicate look to the cushion. You have so much imagination, I love seeing what you come up with. Makes me want to try some of these hexies. LOL
Thank you Kathleen, your comments are always so encouraging! I hope you will join the hexie revolution 🙂 Natalie x
Gorgeous – really fresh pretty and charming!
That’s exactly the look I was going for, so your feedback is so encouraging! Thanks so much Jules! Natalie x
This is gorgeous. I have been in love with hexies for months now but not done any tiny ones yet. Popping over to faeries and fibers to see their site too.
Thank you Kay – if you want to be ‘wowed!’ by tiny hexies, hop over to Gum Valley Patchwork http://gumvalleypatchwork.typepad.com/my_weblog/my-dear-prudence-hexagon-quilt.html Linda has made an amazing hexie quilt from thousands of 1/4″ hexagons! Blows your socks off when you see it, Natalie x
Beautiful! I love how you have combined embroidery and hexagons, 2 such gorgeous things!! I don’t know what it is about hexies, but there seems to be no cure 😦 I have so nearly finished a hexie quilt for my daughter, but instead of being fed up with them, I already have 4 new hexie projects lined up ready to start!! Oh well! 🙂
I’ve been over to have a peek at your daughter’s hexie quilt Karen – such lovely sunny yellows – perfect for summer! I’m so glad you’re having fun with it! Natalie x
Natalie, there is no cure – don’t fight it girl – revel in it! Keep on hexing 🙂
I think you are right Debbie, I surrender! 🙂 x
For once a condition that the only cure [in my mind] is to increase the frequency and severity. I live your pillow it is so delightful. Your photography is so inspiring. Thank you sharing, best wishes, Carina
Your comment has really brightened my day, thank you Carina! So glad you feel inspired, Natalie x
Your Harriet pillow is so delicate and pretty! Such lovely little details in the embroidery, hexies and piping! Love, love, love it! And thanks for the kind words about my blog! And as for hexagon-itis or hexie-mania, I’ve got it too and I don’t want to be cured!
Karen
Thanks Karen. I’m sorry to say it, but I think you are too far gone to ever be cured! 🙂 🙂 x